Django + PyTorch で画像認識 Web アプリを作る
DjangoとPyTorchで画像認識Webアプリを作ろうと思ったところ、Djangoのクラスベースビューを使いつつAjaxでグラフ描画するという例が見つからなかったので、試行錯誤して実装してみました。今回はその内容の共有をしたいと思います。
ソースコードはhttps://github.com/noriho137/image-classifierにアップしてあります。
はじめに
検証した環境は次のとおりです。
作るもの
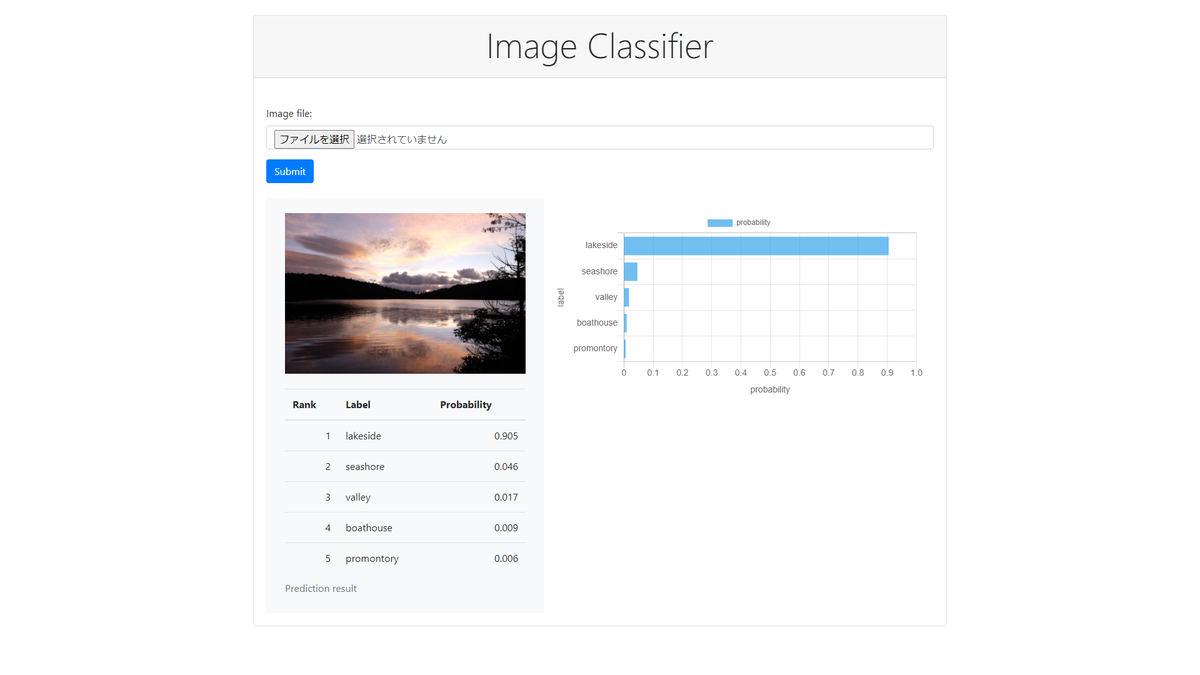
画像ファイルをアップロードして画像認識を行い、認識結果をブラウザ上に表示するWebアプリケーションを作成します。 WebアプリのフレームワークにはDjangoを利用します。 画像認識にはPyTorchのImageNet学習済みモデルを利用します。 認識結果の上位$N$件までのラベル名と確率を表とグラフで表示します。 こんな感じです。
プロジェクト&アプリケーション作成
プロジェクト作成
まずはDjangoのプロジェクト作成。Django公式のチュートリアルによると django-admin startproject {プロジェクト名} で作成できますが、こうすると {プロジェクト名} と同じ名前で設定用ディレクトリが作成されてしまってややこしくなります。こんな感じ。
{プロジェクト名}/
├─ {プロジェクト名}/
│  ├─ __init__.py
│  ├─ asgi.py
│  ├─ urls.py
│  ├─ settings.py
│  └─ wsgi.py
└─ manage.py
これを回避するためにプロジェクト作成時に次のようなコマンドを実行します。最後のピリオドを忘れずに。これでカレントディレクトリにconfigという名前で設定用ディレクトリが作成されます。
mkdir {プロジェクト名}/
cd {プロジェクト名}/
django-admin startproject config .
こんな感じのディレクトリ構成になります。
{プロジェクト名}/
├─ config/
│  ├─ __init__.py
│  ├─ asgi.py
│  ├─ urls.py
│  ├─ settings.py
│  └─ wsgi.py
└─ manage.py
アプリケーション作成
続いてアプリケーションの作成を行います。アプリケーションの作成コマンドは python manage.py startapp {アプリケーション名} です。今回はclassifierという名前にします。
python manage.py startapp classifier
この時点でのディレクトリ構成は次のようになっています。
image-recognition/
├─ classifier/
│  ├─ migrations/
│  │  └─ __init__.py
│  ├─ __init__.py
│  ├─ admin.py
│  ├─ apps.py
│  ├─ models.py
│  ├─ tests.py
│  └─ views.py
├─ config/
│  ├─ __init__.py
│  ├─ asgi.py
│  ├─ settings.py
│  ├─ urls.py
│  └─ wsgi.py
└─ manage.py
ちなみにここからファイルを作成して、最終的には次のような構成になります。
image-recognition/
├─ classifier/
│  ├─ migrations/
│  │  └─ __init__.py
│  ├─ admin.py
│  ├─ apps.py
│  ├─ forms.py
│  ├─ models.py
│  ├─ predictor.py
│  ├─ tests.py
│  ├─ urls.py
│  └─ views.py
├─ config/
│  ├─ __init__.py
│  ├─ asgi.py
│  ├─ settings.py
│  ├─ urls.py
│  └─ wsgi.py
├─ pretrained/
├─ static/
│  ├─ css/
│  │  └─ style.css
│  └─ js/
│     ├─ ajax.js
│     └─ barchart.js
├─ templates/
│  ├─ classifier.html
│  └─ result.html
├─ .env
└─ manage.py
全体的な設定
settings.py
config/settings.pyのINSTALLED_APPSにclassifierアプリを追加します。
INSTALLED_APPS = [
    'django.contrib.admin',
    'django.contrib.auth',
    'django.contrib.contenttypes',
    'django.contrib.sessions',
    'django.contrib.messages',
    'django.contrib.staticfiles',

    # Local
    'classifier.apps.ClassifierConfig',
]
TEMPLATESの'DIRS'の行を編集して'DIRS': [str(BASE_DIR.joinpath('templates'))]にします。これによりテンプレートを一か所(この場合はtemplates/配下)で管理することができるようになり、プロジェクト内にアプリケーションを複数作成した場合でも管理しやすくなります。
TEMPLATES = [
    {
        'BACKEND': 'django.template.backends.django.DjangoTemplates',
        # 'DIRS': [],
        'DIRS': [str(BASE_DIR.joinpath('templates'))],
        'APP_DIRS': True,
        'OPTIONS': {
            'context_processors': [
                'django.template.context_processors.debug',
                'django.template.context_processors.request',
                'django.contrib.auth.context_processors.auth',
                'django.contrib.messages.context_processors.messages',
            ],
        },
    },
]
アップロードした画像をブラウザ上に表示したいので、MEDIA_URLでメディアファイルの公開先を指定します。また、MEDIA_ROOTでDjangoが画像ファイルを保存するディレクトリを指定します。
MEDIA_URL = '/media/'
MEDIA_ROOT = os.path.join(BASE_DIR, 'media')
ファイル.envに記述した各種環境変数を読み込みます。
from environs import Env
(省略)
env = Env()
env.read_env()
(省略)
SECRET_KEY = env.str('DJANGO_SECRET_KEY')
(省略)
DEBUG = env.bool('DJANGO_DEBUG', default=False)
(省略)
PRETRAINED_MODEL_NAME = env.str('PRETRAINED_MODEL_NAME')
PRETRAINED_MODEL_PATH = env.str('PRETRAINED_MODEL_PATH')
CLASS_INDEX = env.str('CLASS_INDEX')
MAX_RANK = env.int('MAX_RANK')
ここで
SECRET_KEY:Djangoの暗号化署名のキーPRETRAINED_MODEL_NAME:PyTorchのImageNet学習済みモデルの名前(例えばvgg16)PRETRAINED_MODEL_PATH:PyTorchのImageNet学習済みモデルのパス(例えば./pretrained/vgg16-397923af.pth)CLASS_INDEX:クラス番号とラベル名の関係が定義されたファイルのパス(例えば./pretrained/imagenet_class_index.json)MAX_RANK:最大何件まで結果を表示するかを指定
です。
環境変数
これらの変数にセットしている値は、ファイル.envを作成しておき、そこに環境変数として定義しておきます。
# Django settings
export DJANGO_SECRET_KEY={Django secret key generated above}
export DJANGO_DEBUG=True

# Classification model
export PRETRAINED_MODEL_NAME=vgg16
export PRETRAINED_MODEL_PATH=./pretrained/vgg16-397923af.pth
export CLASS_INDEX=./pretrained/imagenet_class_index.json
export MAX_RANK=5
上記の{Django secret key generated above}の部分は次のコマンドで生成した値を記述します(Django for Professionalsを参考にしました)。暗号化署名のキーなので各自で生成して、公開しないように注意しなければなりません。間違ってGitHubなどに掲載しないように。
python -c "import secrets; print(secrets.token_urlsafe(38))"
PRETRAINED_MODEL_PATHで指定している学習済みモデルは例えば下記があります。事前にダウンロードしておきます。
CLASS_INDEXで指定しているjsonファイルは下記からダウンロードできます。
https://s3.amazonaws.com/deep-learning-models/image-models/imagenet_class_index.json
urls.py
config/urls.pyにルーティングを記述します。http://{IP Address}:{Port #}/へのアクセスがあったら、classifier/urls.pyに処理を渡すようにします。
from django.contrib import admin
from django.contrib.staticfiles.urls import static
from django.urls import include, path
from . import settings

urlpatterns = [
    path('admin/', admin.site.urls),
    path('', include('classifier.urls')),
]

urlpatterns += static(settings.MEDIA_URL, document_root=settings.MEDIA_ROOT)
classifier/urls.pyでビューClassifierView(これから作成するもの)と結びつけます。
from django.urls import path
from .views import ClassifierView


app_name = 'classifier'
urlpatterns = [
    path('', ClassifierView.as_view(), name='classifier'),
]
Model
それではいよいよ処理の中身を実装していきます。DjangoのアーキテクチャはMVT(Model View Template)なので、その順に説明します。
classifierアプリケーションのモデルをclassifier/models.pyに実装します。モデルはDBに画像ファイルを保存するために、django.db.models.ImageFiledを使ってフィールドを定義します。
from django.db import models


class ImageModel(models.Model):
    image = models.ImageField(verbose_name='Image file', upload_to='images')
ちなみに厳密にはDBに格納されるのは画像ファイルのパスであり、ファイルの実体はconfig/settings.pyにてMEDIA_ROOTで指定したディレクトリ(のさらに下にImageFieldの引数upload_toで指定したディレクトリが作成されて、その配下)に格納されます。
Form
フォームで入力するのは画像ファイルだけなので、フォーム用のクラスはdjango.forms.ModelFormを継承して作成することにします。そうすることでモデルのフィールド定義を流用でき、フォームの記述がコンパクトになるメリットがあります(今回はフィールドが1個しかないのであまり変わりませんが)。
classifier/forms.py
from django import forms
from .models import ImageModel


class ImageForm(forms.ModelForm):
    class Meta:
        model = ImageModel
        fields = ('image',)

    def __init__(self, *args, **kwargs):
        super().__init__(*args, **kwargs)
        for field in self.fields.values():
            field.widget.attrs['class'] = 'form-control'
画面にBootstrapを利用しているので、__init__の中でBootstrapのスタイルを指定しています。今回はBootstrapの説明は割愛します。
ちなみに、フォームに入力した画像データはAjaxのPOSTリクエストでサーバに送信して、ビューで処理します。ビューで画像認識を行い、その結果をAjaxで返すようにしました。
View
classifierアプリケーションのビューをファイルclassifier/views.pyに実装します。今回はフォームを扱っているので、django.views.generic.FormViewを継承して作成します。フィールドtemplate_nameでテンプレートと、form_classでフォームと結びつけます。また、フォームのバリデーションがOKだった場合に実行されるメソッドform_validとNGだった場合に実行されるメソッドform_invalidをオーバーライドします。ビューの処理が実行される契機としては、初期表示時のGET処理と画像アップロード時のPOST処理があります。
- 初期表示時(GET)
- 単純に
template_nameで指定したテンプレートを描画
- 単純に
- 画像アップロード時(POST)
classifier/views.py
import json
import logging

from django.conf import settings
from django.http import HttpResponse
from django.urls import reverse_lazy
from django.views import generic

from .forms import ImageForm
from .models import ImageModel
from .predictor import predict

logger = logging.getLogger(__name__)


class ClassifierView(generic.FormView):
    template_name = 'classifier.html'
    form_class = ImageForm
    success_url = reverse_lazy('classifier:classifier')

    def form_valid(self, form):
        logger.info('form_valid start')

        if self.request.is_ajax():
            logger.info('ajax request')

            image = form.save(commit=False)
            image.save()
            logger.info('saved')

            max_id = ImageModel.objects.latest('id').id
            obj = ImageModel.objects.get(id=max_id)

            top_k_predictions_tmp = predict(obj.image, k=settings.MAX_RANK)
            logger.info(top_k_predictions_tmp)

            top_k_predictions = []
            for prediction in top_k_predictions_tmp:
                top_k_predictions.append({'label': prediction[1],
                                          'probability': float(prediction[2])})

            logger.info(self.template_name)
            logger.info(form)
            logger.info(obj.image.url)
            logger.info(top_k_predictions)

            data_json = json.dumps({'top_k_predictions': top_k_predictions,
                                    'image_url': obj.image.url})
            return HttpResponse(data_json, content_type='application/json')
        else:
            logger.info('not ajax request')
            return super().form_valid(form)

    def form_invalid(self, form):
        logger.info('form_invalid start')
        if self.request.is_ajax():
            logger.info('ajax request')
            response = HttpResponse({'error': 'Unprocessable Entity'})
            response.status_code = 422
            return response
        else:
            logger.info('not ajax request')
            return super().form_invalid(form)
画像認識の処理(PyTorch)
画像認識はPyTorchを用いて実装します。
classifier/predictor.py
from django.conf import settings
from django.core.cache import cache

import json
import logging
from PIL import Image

import torch
import torch.nn as nn
from torchvision import models
from torchvision import transforms

logger = logging.getLogger(__name__)


def make_model(model_name):
    logger.info(f'create {model_name}')
    method = getattr(models, model_name)
    model = method()
    return model


def predict(image_file, k=5):
    logger.info(image_file)
    logger.info(k)

    img = Image.open(image_file)

    # Preprocess
    preprocess_img = transforms.Compose([
        transforms.Resize(224),
        transforms.CenterCrop(224),
        transforms.ToTensor(),
        transforms.Normalize((0.485, 0.456, 0.406), (0.229, 0.224, 0.225))
    ])
    img_transformed = preprocess_img(img)
    inputs = img_transformed.unsqueeze_(0)

    # Create model
    cache_key = 'model'
    model = cache.get(cache_key)
    if model is None:
        logger.info('model is not cached')
        model = make_model(settings.PRETRAINED_MODEL_NAME)
        model.load_state_dict(torch.load(settings.PRETRAINED_MODEL_PATH),
                              strict=False)
        cache.set(cache_key, model, None)
    else:
        logger.info('use cached model')

    # Set evaluation mode
    model.eval()

    # Input the image to the model and input the output to softmax
    out = model(inputs)
    out = nn.functional.softmax(out, dim=1)

    # Get top k probabilities and class indices
    top_k_values = out.topk(k).values.detach().numpy()[0]
    top_k_indices = out.topk(k).indices.detach().numpy()[0]

    # Create a dictionary that converts class indices to label names
    class_index = json.load(open(settings.CLASS_INDEX, 'r'))
    labels = {int(key): value for key, value in class_index.items()}

    # Get top k probabilities and labels
    top_k_label_prob = [(labels[idx][0], labels[idx][1], prob)
                        for prob, idx in zip(top_k_values, top_k_indices)]

    return top_k_label_prob
前処理
まずtransforms.Composeで前処理を行います。引数に渡しているパラメータは適当に決めた訳ではなく、学習済みモデルで実施した前処理と一致させる必要があるのでこのような値になっています。
モデル生成と学習済み重みの復元
画像認識モデルはサイズが大きいので、リクエストのたびにストレージから読み込んでいたのでは処理に時間がかかってしまいます。そこで、Djangoのキャッシュの仕組みを利用して、画像認識モデルをキャッシュに保持するようにします。cache.setでキャッシュに保持し、cache.getでキャッシュから読み込むことができます。
キャッシュに存在しない場合はmake_modelでモデルを生成していますが、ここは少々トリッキーです。torchvision.modelsの中には様々な画像認識モデルのクラスが定義されており、それらのクラスのオブジェクトを生成する関数も定義されています。method = getattr(models, model_name)でオブジェクトmodelsの属性model_nameを取得できます。このとき取得できるのがモデルを生成する関数なので、引き続いてmethod()でモデルを生成することができます。
例えば、AlexNetモデルを生成する関数alexnet()がありますが、method = getattr(models, 'alexnet')とすると、AlexNetモデルを生成する関数alexnetが取得でき、method()とすることでalexnet()が実行されます。
設定ファイルで様々なモデルを指定できるようにするためにこのような実装にしました。
モデルが生成出来たら、model.load_state_dictでストレージから学習済みの重みを読み込んでモデルにセットします。
モデルを生成する際に学習済みモデルをダウンロードして取得することもできますが、ダウンロードに時間がかかるので、今回は予めダウンロードしておいて、そのパスを指定する方針にしました。
推論
model.eval()で推論モードにセットします。
後はmodel(inputs)のようにモデルに前処理済みの画像データinputを与えれば、推論結果が得られます。
最終的には各カテゴリの確率が欲しいのでソフトマックス関数を使用します。
出力結果から上位$K$個を抜き出して、タプル(インデックス, ラベル名, 確率)のリストを作成して呼び出し元に返却します。
Template
classifierアプリケーションのテンプレートをtemplates/classifier.htmlに作成します。
templates/classifier.html
<!DOCTYPE html>
{% load static %}
<html lang="ja">
<head>
    <meta charset="UTF-8">
    <title>Image Classifier</title>
   <link rel="stylesheet" href="https://stackpath.bootstrapcdn.com/bootstrap/4.5.2/css/bootstrap.min.css" integrity="sha384-JcKb8q3iqJ61gNV9KGb8thSsNjpSL0n8PARn9HuZOnIxN0hoP+VmmDGMN5t9UJ0Z" crossorigin="anonymous">
    <script src="https://cdnjs.cloudflare.com/ajax/libs/Chart.js/2.9.3/Chart.min.js"></script>
</head>
<body class="container">
    <div class="card mt-4 mb-4">
        <div class="card-header">
            <h1 class="display-4 text-center">Image Classifier</h1>
        </div>
        <div class="card-body">
            <div class="mx-2 my-4">
                <form method="post" enctype="multipart/form-data">
                    {% csrf_token %}
                    <div class="input-group">
                        <div class="custom-file">
                            <input type="file" class="custom-file-input" id="inputGroupFile" name="{{ form.image.html_name }}" required>
                            <label class="custom-file-label" for="inputGroupFile" aria-describedby="inputGroupFileAddon">Choose image file</label>
                        </div>
                        <div class="input-group-append">
                            <button class="btn btn-primary" type="submit" id="inputGroupFileAddon">Submit</button>
                        </div>
                    </div>
                </form>
            </div>
            <div class="mx-4 my-2">
                {# replace by Ajax #}
                <div class="row">
                    <div class="col-lg-5">
                        <div>
                            <img id="submittedImage" />
                        </div>
                        <div>
                            <table id="rankingTable"></table>
                        </div>
                    </div>
                    <div class="col-lg-7">
                        <div>
                            <canvas id="barChart" height="0"></canvas>
                        </div>
                    </div>
                </div>
            </div>
        </div>
    </div>
    <script src="https://code.jquery.com/jquery-3.5.1.min.js" integrity="sha256-9/aliU8dGd2tb6OSsuzixeV4y/faTqgFtohetphbbj0=" crossorigin="anonymous"></script>
    <script src="https://cdn.jsdelivr.net/npm/bs-custom-file-input/dist/bs-custom-file-input.js"></script>
    <script type="text/javascript" src="{% static 'js/ajax.js' %}"></script>
    <script type="text/javascript" src="{% static 'js/barchart.js' %}"></script>
    <script>
       bsCustomFileInput.init();
   </script>
</body>
</html>
ここでのポイントは2つ。
画像ファイル送信用のフォームを作成
Djangoでは{{ form.as_p }}のようにすればフォームを表示できるのですが、見栄えをよくするためにBootstrapを利用しています。当初はDjangoのテンプレートタグのみで描画しようと考え、いろいろと試行錯誤しましたが、細かく整えるのは無理そうとの結論に至りました。Djangoの機能を使うことに固執しすぎるのも良くないですよね。<form method="post" enctype="multipart/form-data"> {% csrf_token %} <div class="input-group"> <div class="custom-file"> <input type="file" class="custom-file-input" id="inputGroupFile" name="{{ form.image.html_name }}" required> <label class="custom-file-label" for="inputGroupFile" aria-describedby="inputGroupFileAddon">Choose image file</label> </div> <div class="input-group-append"> <button class="btn btn-primary" type="submit" id="inputGroupFileAddon">Submit</button> </div> </div> </form>Ajaxで描画する領域を用意
Ajaxでレスポンスを受け取ったら、その内容をここに埋め込むという方針です。<img id="submittedImage" />:アップロードした画像を埋め込む場所<table id="rankingTable"></table>:予測したラベルとその確率の一覧表を埋め込む場所<canvas id="barChart" height="0"></canvas>:予測したラベルとその確率の水平棒グラフを埋め込む場所
<div class="row">
    <div class="col-lg-5">
        <div>
            <img id="submittedImage" />
        </div>
        <div>
            <table id="rankingTable"></table>
        </div>
    </div>
    <div class="col-lg-7">
        <div>
            <canvas id="barChart" height="0"></canvas>
        </div>
    </div>
</div>
Ajax
Ajaxの実装にはjQueryを利用しています。formでsubmitされたのを契機にして、POSTリクエストで画像ファイルを送信するようにします。$.ajaxにてリクエストの設定をします。また、done(正常時の処理)、fail(異常時の処理)、always(正常時でも異常時でも実行される後処理)をそれぞれ実装します。処理概要は次のとおりです:
done- レスポンスを受け取り、レスポンスに含まれるJSONをパース
- パースした内容を基に、画像の表示、表の作成、グラフの描画を実施
fail- ブラウザ上にアラートでエラーを通知
always- 特になし
ちなみにgetCookieの実装はDjangoのドキュメントにあるCross Site Request Forgery protectionを流用させてもらいました。
static/js/ajax.js
/*
 * This function is from Django official web site:
 *   https://docs.djangoproject.com/en/3.1/ref/csrf/
 */
function getCookie(name) {
    let cookieValue = null;
    if (document.cookie && document.cookie !== '') {
        const cookies = document.cookie.split(';');
        for (let i = 0; i < cookies.length; i++) {
            const cookie = cookies[i].trim();
            // Does this cookie string begin with the name we want?
            if (cookie.substring(0, name.length + 1) === (name + '=')) {
                cookieValue = decodeURIComponent(cookie.substring(name.length + 1));
                break;
            }
        }
    }
    return cookieValue;
}

const csrftoken = getCookie('csrftoken');

function csrfSafeMethod(method) {
    // these HTTP methods do not require CSRF protection
    return (/^(GET|HEAD|OPTIONS|TRACE)$/.test(method));
}

$.ajaxSetup({
    beforeSend: function(xhr, settings) {
        if (!csrfSafeMethod(settings.type) && !this.crossDomain) {
            xhr.setRequestHeader('X-CSRFToken', csrftoken);
        }
    }
});

$('form').submit(function(event) {
    event.preventDefault();
    var form = $(this);
    var formData = new FormData($('form').get(0));
    $.ajax({
        type: 'POST',
        url: form.prop('action'),
        method: form.prop('method'),
        data: formData,
        processData: false,
        contentType: false,
        timeout: 10000,
        dataType: 'text',
    }).done(function(response) {
        console.log('done');

        var parsedResponse = JSON.parse(response);

        // show image
        showImage(parsedResponse.image_url);

        // create table
        createTable(parsedResponse.top_k_predictions);

        // draw chart
        drawChart(parsedResponse.top_k_predictions);
    }).fail(function(jqXHR, textStatus, errorThrown) {
        console.log('fail');
        console.log(jqXHR.status);
        console.log(textStatus);
        console.log(errorThrown);
        alert(jqXHR.status + ' Error: ' + errorThrown);
    }).always(function() {
        console.log('always');
    });
});

function showImage(image_url) {
    console.log('showImage start');
    var img = $('#submittedImage');
    img.attr('src', image_url);
    img.addClass('img-fluid mx-auto d-block mt-4 mb-4')
    console.log('showImage end');
}

function createTable(top_k_predictions) {
    console.log('createTable start');
    var table = $('#rankingTable');
    table.empty();
    table.append('<caption>Prediction result</caption>');
    table.append('<thead><th>Rank</th><th>Label</th><th>Probability</th></thead>');
    table.append('<tbody></tbody>');
    for (var i = 0; i < top_k_predictions.length; i++) {
        var row = $("<tr></tr>");
        row.append($('<td align="right"></td>').text(i + 1));
        row.append($('<td></td>').text(top_k_predictions[i].label));
        row.append($('<td align="right"></td>').text(top_k_predictions[i].probability.toFixed(3)));
        table.append(row);
    }
    table.addClass('table bg-light');
    console.log('createTable end');
}
グラフ描画
グラフ描画にはChart.jsを利用します。
static/js/barchart.js
function setData(top_k_predictions) {
    var labels = [];
    var probabilities = [];

    for (var i = 0; i < top_k_predictions.length; i++) {
        labels.push(top_k_predictions[i].label);
        probabilities.push(top_k_predictions[i].probability);
    }

    var data = {
        labels: labels,
        fontSize: 18,
        datasets: [{
            label: 'probability',
            data: probabilities,
            backgroundColor: 'rgba(54, 162, 235, 0.7)'
        }]
    };
    return data;
}

function setOptions() {
    var options = {
        responsive: true,
        maintainAspectRatio: true,
        scales: {
            xAxes: [{
                gridLines: {
                    display: true
                },
                scaleLabel: {
                    display: true,
                    labelString: 'probability',
                    fontSize: 14
                },
                ticks: {
                    min: 0.0,
                    max: 1.0,
                    fontSize: 14
                }
            }],
            yAxes: [{
                scaleLabel: {
                    display: true,
                    labelString: 'label',
                    fontSize: 14
                },
                ticks: {
                    autoSkip: false,
                    fontSize: 14
                }
            }]
        }
    };
    return options;
}

function drawChart(top_k_predictions) {
    console.log('drawChart start');

    var ctx = document.getElementById('barChart');
    var data = setData(top_k_predictions);
    var options = setOptions();

    // set height according to the number of data
    ctx.height = 18 * data.datasets[0]['data'].length + 60;

    // destroy chart instance if chart instance already exists
    if (window.myBarChart) {
        window.myBarChart.destroy();
    }

    window.myBarChart = new Chart(ctx, {
        type: 'horizontalBar',
        data: data,
        options: options
    });

    $('#barChart').addClass('mt-4');

    console.log('drawChart end');
}
実行
パッケージのインストールや実行手順はhttps://github.com/noriho137/image-classifierを参考にしてください。